

Creating easy DIY under the sea decorations is one of the simplest ways to transform any room into a magical ocean world—without spending a fortune. Whether you’re planning a kids’ party, refreshing a bedroom, or designing a summer-themed event, ocean-inspired décor brings a sense of fun, calm, and creativity.
This guide walks you through practical, budget-friendly ideas, quick projects you can finish in under 30 minutes, and clever styling tips that make your setup look professionally done. Expect hands-on inspiration, real examples, and easy-to-follow techniques you can actually use today.
In This Article
Why “Under the Sea” Décor Never Goes Out of Style
Ocean-themed décor continues to trend because it blends playfulness with relaxation. The color palette alone—soft blues, turquoise, sandy neutrals—creates a calming atmosphere, while sea creatures add personality and charm.
It also works across different settings, making it incredibly versatile:
- Kids’ rooms: Encourages imagination and storytelling
- Birthday parties: Instantly creates a cohesive, fun theme
- Classrooms: Makes learning spaces more engaging
- Seasonal décor: Perfect for summer or beach-inspired interiors
What makes it even more appealing is how adaptable it is. You can go cute and cartoonish with bright colors or lean into a more coastal, elegant aesthetic with subtle textures and natural elements.
From a practical standpoint, this theme is ideal for DIY because many decorations can be made from common household items—no specialized crafting skills required.
Must-Have Materials for Easy DIY Under the Sea Decorations
Before diving into your projects, having the right materials on hand makes everything smoother and more enjoyable. The best part? Most supplies are affordable and easy to find.
Everyday Budget-Friendly Supplies
These are the essentials you’ll use in multiple projects:
- Colored paper (blue, green, coral, white)
- Paper plates and cups
- Cardboard or cereal boxes
- Tissue paper or crepe paper
- String, yarn, or clear fishing line
- Glue, tape, and scissors
Optional Upgrades for a Polished Look
If you want your decorations to look more “Pinterest-worthy,” a few extras go a long way:
- Glue gun for sturdier builds
- LED string lights for underwater glow effects
- Sheer fabric for wave-like textures
- Metallic or glitter paper for shimmer
Eco-Friendly Alternatives
DIY décor doesn’t have to create waste. Many ocean-themed crafts work beautifully with recycled materials:
- Plastic bottles → jellyfish or bubbles
- Old magazines → colorful fish scales
- Scrap fabric → seaweed or coral textures
Using recycled items not only saves money but also adds a creative, textured look that store-bought décor often lacks.

Easy DIY Under the Sea Decorations You Can Make in Under 30 Minutes
Short on time? These easy DIY under the sea decorations deliver maximum visual impact with minimal effort. Perfect for last-minute setups or quick creative sessions.
Paper Jellyfish Lanterns
One of the most eye-catching decorations you can make fast.
How to do it:
- Use a paper bowl or lantern as the top
- Attach strips of tissue paper underneath
- Add string to hang
The flowing strands create a realistic “floating” effect that looks amazing when hung at different heights.
Hanging Fish Garlands
Simple, colorful, and perfect for filling empty space.
Steps:
- Cut fish shapes from colored paper
- Decorate with markers or stickers
- String them together with yarn or fishing line
Mix sizes and colors to make the garland feel dynamic and lively.
Seashell Picture Frames
A quick craft that doubles as décor and keepsake.
What you’ll need:
- A basic photo frame
- Small shells (real or craft store)
- Glue
Attach shells around the border and let it dry. It instantly creates a coastal, beachy vibe.
Quick Comparison: Which Project Should You Try?
| Project | Time Needed | Difficulty | Best For |
| Jellyfish Lanterns | 20–30 min | Easy | Ceiling décor |
| Fish Garlands | 15–25 min | Very easy | Walls, backdrops |
| Seashell Frames | 20–30 min | Easy | Tables, keepsakes |
These quick wins are perfect starting points. They build confidence and give you visible results fast—so you stay motivated to create more.
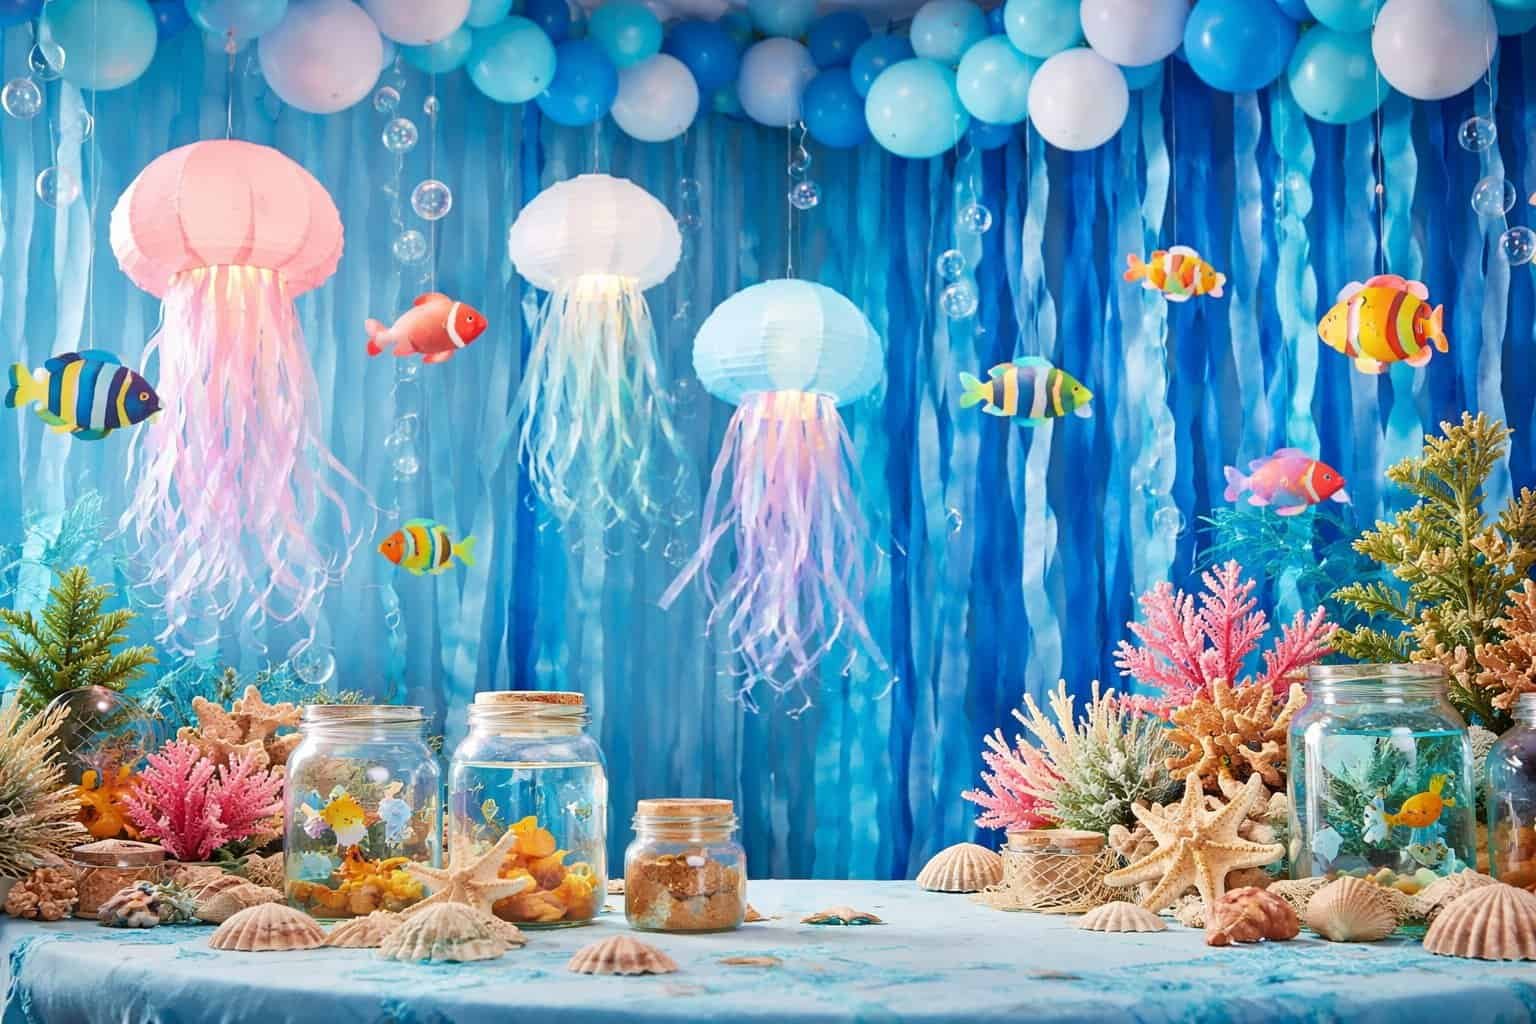
Create a Stunning Ocean Backdrop (Perfect for Parties & Photos)
A well-designed backdrop instantly becomes the centerpiece of your under-the-sea setup. It anchors the entire theme and doubles as a photo zone—especially important for parties or social media moments.
Layered Streamers for a Wave Effect
Creating depth is the secret to making your backdrop look immersive rather than flat.
How to achieve it:
- Use streamers or crepe paper in multiple shades of blue
- Hang them vertically, slightly overlapping
- Twist some sections to mimic flowing water
Adding a few hints of green or turquoise prevents the design from looking too uniform.
DIY Coral Reef Wall
Bring the ocean floor to life with textured coral shapes.
What works best:
- Cut coral forms from cardstock or foam sheets
- Use colors like coral pink, orange, and soft purple
- Layer pieces to create dimension
Position coral toward the bottom of the backdrop to ground the design visually.
Balloon Arches in Ocean Tones
Balloon garlands are surprisingly easy and add a professional touch.
Color ideas:
- Deep blue + light blue + white (classic ocean)
- Teal + aqua + coral (tropical reef vibe)
Cluster balloons in uneven sizes to create a more organic, flowing shape—similar to currents in water.
Make It Instagram-Worthy
Small details elevate the entire look:
- Add cut-out fish or sea creatures at different heights
- Use sheer fabric to soften edges and mimic waves
- Incorporate subtle lighting (fairy lights behind fabric)
A strong backdrop doesn’t just look good—it makes every other decoration feel more intentional.
DIY Under the Sea Decorations for Kids (Fun + Mess-Friendly Projects)
Crafting with kids should feel fun, not stressful. These DIY under the sea decorations are simple, safe, and designed to encourage creativity without complicated steps.
Handprint Sea Creatures
A favorite for a reason—personal, playful, and easy.
Ideas to try:
- Handprint octopus (fingers = tentacles)
- Fish using painted palms
- Crabs with thumbprints for claws
Kids love seeing their handprints turn into something recognizable.
Paper Plate Turtles and Crabs
Paper plates are incredibly versatile and sturdy enough for little hands.
Quick method:
- Paint the plate as the shell or body
- Cut out legs and heads from colored paper
- Glue everything together
Add googly eyes for extra personality.
Sponge Painting for Ocean Textures
This technique creates a beautiful underwater effect without precision.
How it works:
- Dip a sponge in blue and green paint
- Dab lightly onto paper or cardboard
- Layer colors to create depth
The result looks like water, bubbles, or even coral patterns—no artistic skills required.
Keep It Simple (and Stress-Free)
A few smart tips make the experience smoother:
- Use washable paints and markers
- Pre-cut shapes for younger kids
- Cover surfaces with newspaper or a plastic sheet
The goal isn’t perfection—it’s letting kids explore and enjoy the process.
Turn Everyday Items into Ocean Treasures
Some of the most creative easy DIY under the sea decorations come from items you already have at home. Upcycling not only saves money but also adds unique character to your décor.
Plastic Bottles → Jellyfish or Submarines
Clear bottles are perfect for ocean-themed crafts.
Jellyfish idea:
- Cut the bottom off the bottle
- Attach ribbon or plastic strips as tentacles
- Hang upside down for a floating effect
Submarine idea:
- Paint the bottle yellow
- Add paper windows and details
Egg Cartons → Seashell Clusters
The curved shapes mimic shells surprisingly well.
Steps:
- Cut individual sections from the carton
- Paint in soft pastel or sandy tones
- Arrange in clusters on walls or tables
They add subtle texture that feels natural and coastal.
Old CDs → Shimmering Fish Scales
Reflective surfaces instantly evoke water movement.
How to use them:
- Cut CDs into small shapes (carefully)
- Glue onto fish cutouts or backdrops
- Let light bounce off the surface
This creates a sparkling underwater effect without buying specialty materials.
Why Upcycling Makes Your Décor Better
Beyond saving money, reused materials bring:
- Texture variety (matte, shiny, layered)
- More originality compared to store-bought items
- A sustainable, eco-conscious approach
When done thoughtfully, upcycled decorations often look more interesting than brand-new ones.
Lighting Tricks That Bring Your Underwater Theme to Life
Lighting is often the missing piece that turns basic décor into a fully immersive under-the-sea experience. The right glow adds depth, movement, and that magical “underwater” feel you can’t achieve with paper crafts alone.
Blue LED String Lights Behind Fabric
Soft, diffused lighting mimics the way sunlight filters through water.
How to set it up:
- Hang sheer white or light blue fabric against a wall
- Place blue LED string lights behind it
- Let the fabric gently drape for a wave-like effect
This creates a subtle glow that instantly elevates your backdrop.
DIY Glowing Jellyfish
Take your earlier jellyfish crafts to the next level.
Quick upgrade:
- Insert battery-operated fairy lights inside the top
- Use semi-transparent materials (tissue paper or plastic)
- Hang at different heights for a floating illusion
The result feels dynamic, especially in dim lighting.
Projection Lights for Moving Wave Effects
If you want a dramatic transformation with minimal effort, projection lights are a game-changer.
- Ocean wave projectors cast moving light patterns across walls and ceilings
- Works especially well for evening events or bedrooms
- Creates a calming, almost aquarium-like ambiance
Day vs Night Setup Tips
| Time of Day | Lighting Strategy | Effect |
| Daytime | Natural light + soft blue accents | Fresh, airy ocean vibe |
| Evening | LED lights + projections | Deep, immersive atmosphere |
| Night | Dim lighting + glowing elements | Magical, dreamy feel |
Balancing brightness is key. Too much light flattens the effect, while layered lighting adds dimension and mood.
Easy DIY Under the Sea Decorations for Tables & Centerpieces
Tables are often overlooked, yet they’re the easiest place to add polished, themed details. Even simple centerpieces can make your entire setup feel cohesive.
Sand-Filled Jars with Mini Sea Scenes
A classic idea that always works.
What to include:
- A layer of sand at the bottom
- Small shells or pebbles
- Mini sea animal figurines
Use clear jars so every layer is visible. It instantly gives a mini beach-in-a-jar effect.
Floating Candles with Ocean Colors
Perfect for a more elegant or evening setup.
How to create:
- Fill a glass bowl with water
- Add a drop of blue food coloring
- Place floating candles on top
The gentle flicker reflects beautifully, especially in dim lighting.
Mini Aquariums (Real or Faux)
For a standout centerpiece, think beyond traditional décor.
Options:
- Real fish tanks (for longer events or permanent décor)
- Faux aquariums using glass containers, pebbles, and plastic plants
Even a simple version creates a strong visual impact.
Budget-Friendly Table Styling Tips
- Scatter small shells or beads across the table
- Use blue or sandy-colored table runners
- Mix heights (tall jars + small accents) for visual interest
Small touches go a long way in making the space feel thoughtfully designed.
Hanging Decorations That Instantly Transform the Room
If you want your space to feel like you’ve stepped underwater, focus on what’s happening above eye level. Hanging decorations create movement and depth that flat surfaces can’t achieve.
Floating Fish with Clear String
This simple trick creates a surprisingly realistic effect.
How to do it:
- Cut fish shapes from paper or foam
- Attach clear fishing line
- Hang them at different lengths
From a distance, they appear to “swim” through the air.
Paper Bubbles and Cascading Streamers
Bubbles are essential for that underwater illusion.
Ideas:
- Cut circles from white or light blue paper
- Hang in clusters to mimic rising bubbles
- Combine with vertical streamers for a waterfall effect
Layering is key—single strands won’t create the same depth.
Ceiling Jellyfish Installations
Turn your ceiling into a focal point.
- Use multiple jellyfish in different sizes
- Hang them in clusters rather than evenly spaced
- Combine with lighting for a glowing effect
This works especially well in smaller rooms where walls are limited.
Create Depth and Movement Like a Pro
To avoid a flat or cluttered look:
- Vary heights, sizes, and spacing
- Stick to a consistent color palette
- Leave some negative space for balance
When done right, hanging decorations make the entire room feel alive—like you’re truly inside an underwater world.
Color Palettes That Make Your Ocean Theme Feel Real
Color is what ties all your easy DIY under the sea decorations together. The right palette creates harmony, while the wrong mix can make even great crafts feel disconnected.
Classic Ocean Palette (Calm & Timeless)
Perfect for a clean, relaxing look:
- Deep navy
- Sky blue
- White
- Soft gray
This combination mimics open water and works beautifully for bedrooms or minimalist setups.
Tropical Reef Palette (Bright & Playful)
Ideal for parties or kids’ spaces:
- Turquoise
- Coral pink
- Sunny yellow
- Sea green
These colors reflect vibrant coral reefs and instantly energize the space.
Coastal Neutral Palette (Elegant & Subtle)
Great for a more grown-up aesthetic:
- Sandy beige
- Driftwood brown
- Soft blue-gray
- Cream
Adding natural textures like rope or linen enhances this style.
How to Avoid Color Overload
Too many colors can make your décor feel chaotic. Keep things balanced:
- Stick to 2–3 main colors
- Use accent colors sparingly
- Repeat colors across different elements for consistency
A cohesive palette makes your DIY decorations look intentional—not random.
Common Mistakes to Avoid When Making Under the Sea Decorations
Even creative projects can fall flat without a bit of planning. Avoid these common pitfalls to keep your décor looking polished.
Overcrowding the Space
Filling every inch with decorations can feel overwhelming.
- Leave breathing room between elements
- Focus on a few standout pieces instead of many small ones
Using Too Many Shades of Blue
Blue is essential—but too many variations can clash.
- Choose 2–3 shades max
- Pair with neutrals or contrasting accents like coral
Ignoring Lighting Balance
Poor lighting can make colors look dull or overly harsh.
- Combine natural and artificial light
- Test your setup before finalizing
Skipping Texture Variety
Flat designs lack depth.
- Mix materials like paper, fabric, and reflective surfaces
- Add layered elements (coral, bubbles, seaweed)
Avoiding these mistakes makes a noticeable difference in the final result.
Style Variations: From Cute Cartoon Ocean to Elegant Coastal Vibes
One of the best things about easy DIY under the sea decorations is how flexible the theme can be. You can easily adapt it to match your personal style or event.
Cute & Playful (Perfect for Kids)
- Bright colors and exaggerated shapes
- Cartoon-style fish, crabs, and octopuses
- Fun textures like pom-poms and googly eyes
Modern Coastal (Clean & Minimal)
- Muted tones and simple shapes
- Focus on texture rather than bold colors
- Minimal decorations with strong visual impact
Vibrant Reef (Bold & Energetic)
- High-contrast colors like coral and turquoise
- Layered elements and dense arrangements
- Great for lively parties
How to Choose the Right Style
Think about:
- The purpose (party, room décor, event)
- The audience (kids vs adults)
- The space size (small rooms benefit from simpler styles)
Matching your style to your space ensures everything feels cohesive.
Related Ideas You Can Explore Next
Once you’ve mastered this theme, it’s easy to branch out into other décor styles that use similar techniques and materials.
- DIY beach-themed decorations for a relaxed, sandy vibe
- Coastal farmhouse décor ideas blending rustic and ocean elements
- Summer party decoration hacks for outdoor gatherings
Exploring related themes helps you reuse materials and expand your creativity without starting from scratch.
Bringing It All Together: Designing Your Own Underwater World
At this point, you have all the pieces—you just need to combine them thoughtfully.
Layer Your Decorations Like a Pro
A well-designed space usually includes:
- Backdrop: Streamers, coral, or balloons
- Hanging décor: Fish, jellyfish, bubbles
- Table accents: Centerpieces and small details
Each layer adds depth and keeps the space visually interesting.
Plan for Your Space Size
| Space Type | Best Approach |
| Small room | Focus on 1–2 key areas, avoid clutter |
| Medium space | Combine backdrop + hanging décor |
| Large space | Use all layers for full immersion |
Final Styling Checklist
Before you finish, take a quick look:
- Are colors consistent?
- Is lighting balanced?
- Do you have enough height variation?
- Is there a clear focal point?
Small adjustments here can dramatically improve the overall look.
FAQ: Easy DIY Under the Sea Decorations
What are the easiest DIY under the sea decorations for beginners?
Simple projects like paper jellyfish, fish garlands, and sand-filled jars are beginner-friendly and require minimal materials.
How can I make under the sea decorations on a budget?
Use recycled items like plastic bottles, egg cartons, and old magazines. Combine them with basic craft supplies for creative, low-cost results.
What colors work best for an ocean-themed setup?
Blues, turquoise, coral, and sandy neutrals work best. Limiting your palette to a few shades keeps the design cohesive.
How do I make my decorations look more realistic?
Layer textures, vary heights, and use lighting effects like blue LEDs or projections to mimic underwater movement.
Can I use these ideas for adult parties or home décor?
Absolutely. Choose a coastal or minimalist palette, reduce bright colors, and focus on texture for a more refined look.
For more inspiration on ocean conservation and real-life marine beauty that can influence your designs, explore resources from the National Oceanic and Atmospheric Administration:
https://www.noaa.gov/
Ready to dive in? Start with one or two simple projects, build your layers, and watch your space transform into a stunning underwater escape. The best part—every piece you create adds a personal touch you simply can’t buy.

I’m the creator behind EasyDecora, a home–decor lover who enjoys discovering simple, beautiful ways to make every room feel cozy and intentional. I share practical tips, creative ideas, and inspiration for anyone who wants to build a home they truly love.