

How to hang curtains with decorative molding is one of those design challenges that looks simple until tools come out. Decorative molding adds architectural value, yet it also limits where hardware can be placed. Curtains installed without a clear strategy often end up hiding beautiful trim, sitting awkwardly low, or damaging expensive millwork.
Decorative molding—whether crown molding, window casing, or picture rails—changes the rules of curtain hanging. Rod placement must respect visual balance, wall structure, and fabric movement at the same time. A well-installed curtain setup can enhance molding instead of competing with it, while a poor one quickly cheapens the room.
This guide explains how to hang curtains with decorative molding in a clean, professional, and damage-free way. Readers will learn:
- Why molding affects curtain height and spacing
- Which methods work best for different molding types
- How to preserve trim while achieving a polished designer look
In This Article
Understanding Decorative Molding Around Windows
Decorative molding frames windows and ceilings, creating depth and structure that flat drywall lacks. Each molding type interacts differently with curtain rods and panels, making identification the first critical step.
Common Types of Decorative Molding
| Molding Type | Typical Location | Curtain Impact |
| Crown molding | Ceiling perimeter | Limits vertical rod placement |
| Window casing | Around window frame | Affects bracket spacing |
| Picture rail molding | Upper wall area | Allows hanging without drilling |
| Cornice molding | Above windows | May replace curtain rods entirely |
Crown molding often creates a narrow gap between ceiling and trim, leaving little room for standard brackets. Window casing molding adds thickness that can push curtains too far forward if ignored. Picture rail molding, commonly found in older homes, offers a built-in hanging solution that avoids wall damage entirely.
Why Molding Changes Curtain Placement
Decorative molding alters three key factors:
- Visual height: Curtains mounted too low shorten walls visually
- Depth: Thick trim pushes rods outward, affecting drape
- Structure: Some molding hides studs or weak plaster underneath
Curtain hardware must work with these elements rather than forcing a standard installation method onto a custom architectural feature.
Why Hanging Curtains with Decorative Molding Requires a Different Method
Standard curtain advice often fails in molded rooms. Decorative trim demands thoughtful placement to avoid clutter, imbalance, or permanent damage.
Visual Balance vs. Functional Mounting
Curtains serve both decorative and practical roles. With molding involved, visual alignment becomes just as important as light control. A rod placed directly over ornate trim can:
- Block carved details
- Interrupt architectural lines
- Create a crowded, top-heavy appearance
Professional designers typically align curtain rods either above the molding or integrated with it, never awkwardly across it.
Structural Challenges Behind Decorative Trim
Walls with molding frequently hide:
- Plaster instead of drywall
- Uneven framing
- Limited stud access
Heavy curtains mounted incorrectly can pull away from the wall, cracking plaster or splitting trim. Choosing the right anchors and placement strategy prevents costly repairs.
Preserving Decorative Molding While Hanging Curtains
Protecting molding requires:
- Avoiding direct drilling into ornate trim
- Distributing curtain weight evenly
- Selecting hardware that clears molding depth
A careful approach ensures the molding remains a focal point rather than collateral damage. When done correctly, how to hang curtains with decorative molding becomes a design upgrade instead of a compromise.
“Architectural details deserve respect. Curtains should frame them, not fight them.” — Interior Design Principle
Tools and Materials Needed to Hang Curtains with Decorative Molding
Proper tools make the difference between a polished installation and visible wall damage. When learning how to hang curtains with decorative molding, hardware selection must account for trim depth, curtain weight, and wall structure.
Essential Tools
- Tape measure with clear inch and centimeter markings
- Pencil for precise, removable marking
- Level to maintain straight rod alignment
- Power drill with wood and masonry bits
- Stud finder suitable for plaster or drywall
Recommended Curtain Hardware
| Hardware Item | Best Use with Decorative Molding |
| Extended wall brackets | Clears deep window casing |
| Low-profile rods | Prevents visual clutter |
| Ceiling-mount rods | Works when wall space is limited |
| Picture rail hooks | Ideal for historic molding |
Extended brackets are especially useful when thick trim pushes standard rods too close to the wall, causing fabric to bunch or scrape the molding.
Choosing the Right Anchors and Screws
Decorative molding often hides plaster walls or shallow studs. Lightweight anchors rarely hold long-term. Instead, professionals recommend:
- Metal toggle bolts for plaster
- Heavy-duty drywall anchors rated 25–50 lbs
- Wood screws when studs are accessible
Curtain weight matters. Blackout curtains can weigh 6–10 lbs per panel, while velvet or thermal-lined drapes may exceed 15 lbs per panel. Hardware must be rated accordingly to avoid sagging or failure.
Measuring Correctly When Decorative Molding Is Present
Measurement errors become obvious once curtains are hung. Decorative molding leaves little room for correction, making accuracy essential.
Determining Rod Height
Rod placement depends on molding type and ceiling height:
- Crown molding present: mount rods 2–4 inches above the molding
- Picture rail molding: hang directly from the rail using hooks
- No upper molding: place rods 4–6 inches above window casing
Higher placement visually lifts ceilings and prevents curtains from cutting across trim details.
Calculating Curtain Length
Use this table as a reliable guide:
| Curtain Style | Ideal Length |
| Floating | ½ inch above floor |
| Floor-length | Touches floor |
| Puddled | 1–3 inches extra |
Measure from the rod position, not the window frame. Decorative molding changes starting points, and ignoring it often leads to curtains that fall short or drag awkwardly.
Accounting for Molding Depth
Deep trim pushes curtains forward. Measure the projection from wall to molding edge and select brackets that extend at least ½–1 inch beyond the trim. This clearance allows curtains to move freely without brushing the molding.
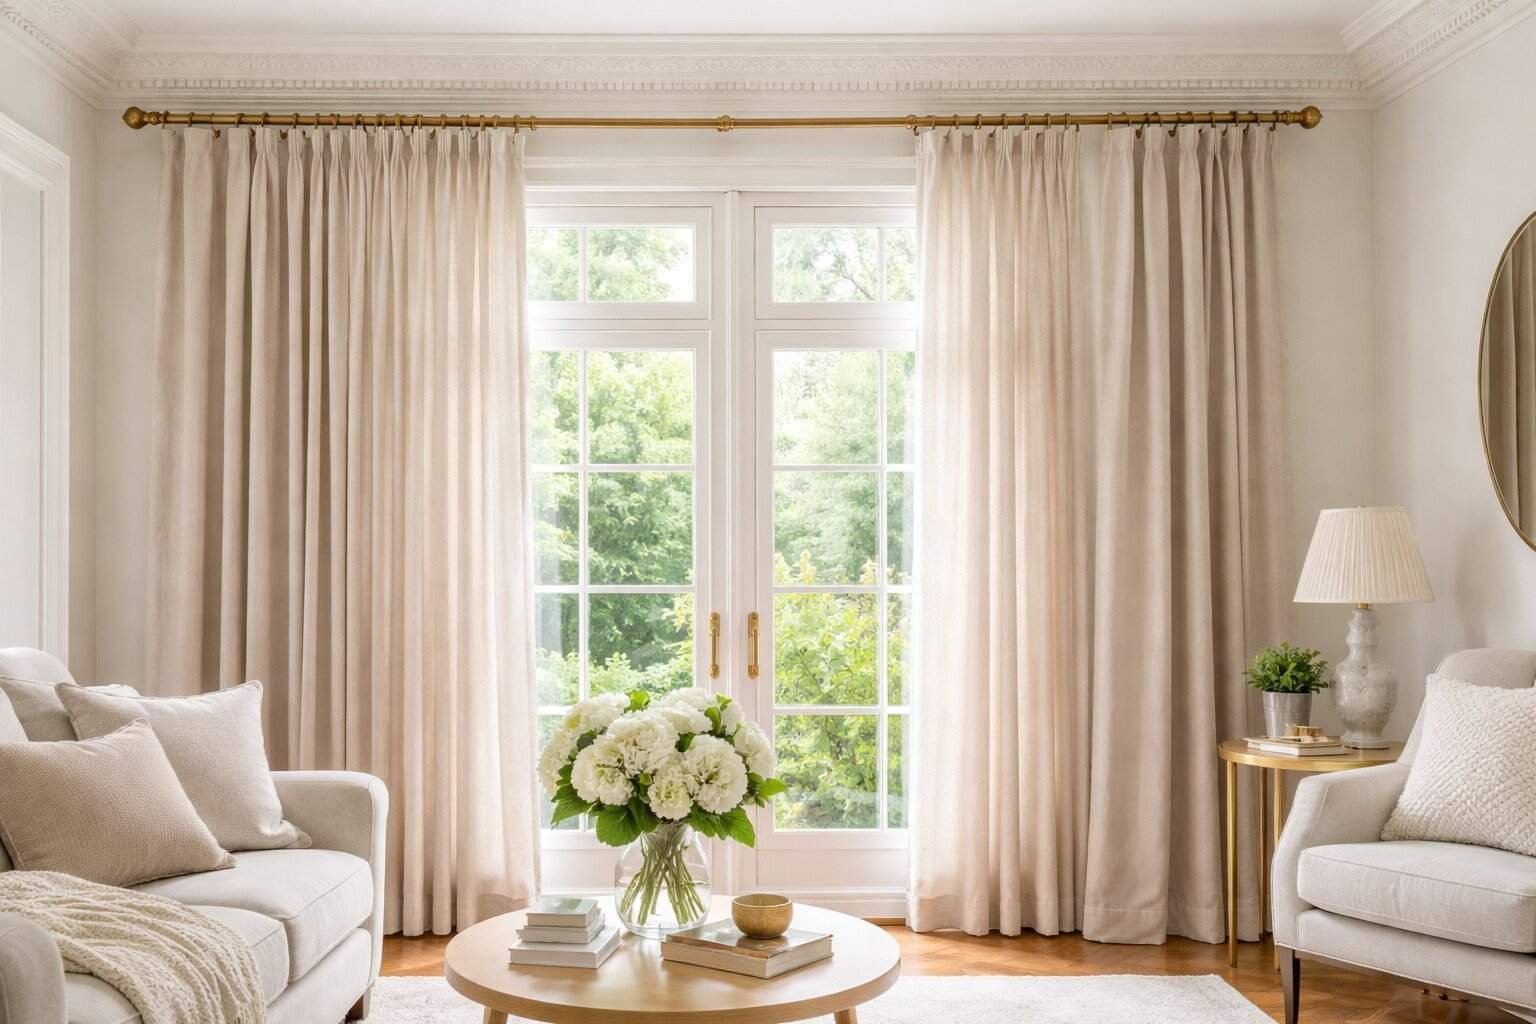
How to Hang Curtains with Decorative Molding Above the Trim
Mounting curtains above decorative molding remains the most popular method in modern interiors. It highlights trim while creating a tall, elegant silhouette.
When Mounting Above Molding Works Best
This method suits:
- Rooms with high ceilings
- Ornate crown molding
- Wide windows needing visual height
Avoid this approach in low-ceiling rooms where added height could overwhelm the space.
Step-by-Step Installation Process
- Measure rod height consistently from ceiling line
- Mark bracket points symmetrically on both sides
- Pre-drill pilot holes to protect plaster
- Secure brackets using anchors or studs
- Mount rod and test weight distribution
Symmetry matters. Even a ¼-inch height difference becomes noticeable when trim lines run across the room.
Design Tips for a Polished Look
- Choose rods in finishes that complement molding color
- Keep finials minimal near ornate trim
- Allow curtains to stack fully off the window when open
This technique shows exactly how to hang curtains with decorative molding while keeping architectural details visible and intact.
How to Hang Curtains with Decorative Molding Using the Picture Rail
Picture rail molding offers one of the cleanest and least invasive ways to hang curtains, especially in older or historically detailed homes. Designed originally to support framed art, picture rails can easily handle curtain weight when used correctly.
Why Picture Rails Work So Well
Picture rails sit 12–20 inches below the ceiling, providing a built-in support line that eliminates drilling into plaster or trim. This makes them ideal for preserving decorative molding.
Key advantages include:
- No wall damage or drilling
- Flexible curtain height adjustment
- Easy seasonal fabric changes
Hardware Needed for Picture Rail Curtain Hanging
| Component | Purpose |
| Picture rail hooks | Attach securely to molding |
| Steel or nylon cords | Support curtain weight |
| Curtain rings with clips | Hold fabric evenly |
| Decorative finials | Add visual finish |
Modern picture rail hooks are typically rated 20–30 lbs per hook, making them suitable for medium to heavy curtains when spaced every 12–18 inches.
Installation Tips for Stability
- Space hooks evenly across the rail
- Use steel cables for heavy drapes
- Test tension before hanging full panels
How to hang curtains with decorative molding becomes straightforward when picture rails are already present. This method respects architectural integrity while delivering a timeless, gallery-inspired look.
How to Hang Curtains with Decorative Molding Without Drilling
Drilling isn’t always an option, especially in rentals or fragile plaster walls. Fortunately, several non-invasive solutions allow curtains to coexist with decorative molding.
Best No-Drill Hanging Options
- Tension rods: Suitable for lightweight panels inside window frames
- Adhesive curtain brackets: Rated up to 20 lbs on smooth surfaces
- Magnetic rods: Work on steel lintels or metal frames
Each solution works best under specific conditions. Adhesive brackets require a clean, flat surface and consistent temperature to maintain bond strength.
Weight and Fabric Limitations
| Hanging Method | Max Recommended Weight |
| Tension rod | 5–8 lbs |
| Adhesive brackets | 15–20 lbs |
| Magnetic rod | 10–12 lbs |
Avoid heavy blackout or lined curtains with no-drill systems. Lightweight sheers or cotton panels perform best.
When No-Drill Methods Are Not Enough
Rooms with wide windows or tall ceilings often require stronger support. In these cases, traditional mounting methods remain safer and more durable.
Choosing the Right Curtain Rod Style for Decorative Molding
Rod style plays a major role in how curtains interact visually with decorative trim. Oversized or ornate rods can compete with molding, while sleek options create balance.
Best Rod Styles for Molded Walls
- Low-profile metal rods for detailed trim
- Wood rods that echo traditional molding
- Ceiling-mounted tracks for minimal visibility
Matching Rod Finish to Molding
Use this guide to coordinate finishes:
| Molding Style | Recommended Rod Finish |
| Traditional | Aged brass, oil-rubbed bronze |
| Modern | Matte black, brushed nickel |
| Painted trim | Match wall or molding color |
Curtain rods should support, not overshadow, architectural details. Thoughtful selection reinforces how to hang curtains with decorative molding in a way that feels intentional and refined.
Curtain Styles That Work Best with Decorative Molding
Curtain style influences how much attention decorative molding receives. Some designs highlight architectural details, while others unintentionally hide them. Selecting the right style is essential when mastering how to hang curtains with decorative molding.
Curtain Styles That Complement Molding
- Pinch pleat curtains create structured folds that echo traditional trim
- Ripple fold curtains offer clean lines suitable for modern molding
- Rod pocket panels work best with simple, flat casing
Structured styles hold their shape, preventing fabric from collapsing over carved trim or crown details.
Fabric Weight and Draping Behavior
| Fabric Type | Best Use with Decorative Molding |
| Linen | Casual rooms, light trim |
| Cotton blends | Versatile, easy movement |
| Velvet | Formal spaces, high ceilings |
| Sheer voile | Layering without hiding trim |
Heavier fabrics require extended brackets to prevent contact with molding. Lighter fabrics allow molding to remain visible, especially when curtains are fully open.
Fullness and Panel Width
Curtains should be 2 to 2.5 times the window width for proper fullness. Insufficient width pulls fabric tight, making trim look bulky. Balanced fullness softens the window while keeping molding lines intact.
Avoiding Damage When Hanging Curtains Near Decorative Molding
Decorative molding is often fragile, especially in older homes. Preventing cracks and chips requires careful preparation and proper load management.
Common Causes of Molding Damage
- Drilling directly into carved trim
- Overloading brackets with heavy curtains
- Using short screws that loosen over time
Protective Installation Practices
- Pre-drill pilot holes to reduce splitting
- Use felt pads behind brackets near trim edges
- Anchor hardware into studs or rated anchors
Weight Distribution Guidelines
| Curtain Weight | Bracket Spacing |
| Up to 10 lbs | Every 36 inches |
| 10–25 lbs | Every 24–30 inches |
| Over 25 lbs | Every 18–24 inches |
Even weight distribution protects walls and ensures long-term stability. Respecting these limits keeps decorative molding intact for years.
Common Mistakes When Learning How to Hang Curtains with Decorative Molding
Mistakes often stem from treating molded walls like flat drywall. Awareness prevents costly corrections.
Frequent Installation Errors
- Mounting rods directly over decorative trim
- Hanging curtains too low, shortening the wall visually
- Choosing oversized finials near detailed molding
Design-Related Missteps
- Curtains blocking crown or picture rail molding
- Hardware finishes clashing with trim style
- Panels too narrow to stack cleanly off windows
How to Fix Existing Mistakes
- Raise rods to align above molding
- Switch to extended brackets for better clearance
- Replace bulky rods with slim-profile designs
Learning how to hang curtains with decorative molding involves precision, not shortcuts. Small adjustments dramatically improve the final look.
Styling Tips to Highlight Both Curtains and Decorative Molding
Curtains and decorative molding should feel like intentional design partners, not competing elements. Styling choices determine whether molding stands out as an architectural feature or fades behind fabric.
Color and Contrast Strategies
- Light curtains against dark molding emphasize trim details
- Matching curtain color to wall paint keeps molding visually dominant
- Neutral fabrics allow ornate molding to become the focal point
Soft contrast usually works best. Bold patterns near detailed trim can feel overwhelming unless the molding is simple and clean-lined.
Layering Curtains Without Hiding Trim
Layering adds depth without sacrificing architecture:
- Sheer panels closest to the window
- Heavier drapes positioned to stack fully outside the molding
- Tiebacks mounted below molding lines
This approach allows light control while keeping decorative molding visible and respected.
Using Curtains to Enhance Architectural Character
Curtains can reinforce style:
- Traditional homes benefit from classic pleats and natural fabrics
- Modern spaces pair well with ripple folds and matte hardware
- Historic interiors shine with picture rail systems and flowing panels
Well-styled curtains frame the molding, guiding the eye rather than interrupting it.
Room-by-Room Advice for Hanging Curtains with Decorative Molding
Each room presents different functional needs, even when decorative molding is consistent throughout the home.
Living Rooms
- Prioritize visual impact and symmetry
- Use fuller panels for a luxurious feel
- Mount rods high to emphasize ceiling height
Bedrooms
- Choose lined or blackout curtains for light control
- Ensure rods clear molding without brushing trim
- Keep hardware quiet and secure for daily use
Dining Rooms
- Lightweight fabrics prevent a heavy look
- Decorative rods can echo formal trim details
- Avoid floor puddling near dining furniture
Historic and Older Homes
- Picture rail systems preserve original plaster
- Avoid drilling into century-old molding
- Select finishes that match existing patina
Room-specific adjustments refine how to hang curtains with decorative molding while respecting each space’s purpose.
Final Thoughts: Mastering How to Hang Curtains with Decorative Molding
Learning how to hang curtains with decorative molding requires more than following standard curtain rules. Molding introduces depth, history, and visual rhythm that must be considered at every step—from measuring and hardware selection to styling and fabric choice.
Key takeaways include:
- Always measure from the rod position, not the window
- Use extended brackets or picture rails to protect trim
- Choose curtain styles that complement molding, not conceal it
When approached thoughtfully, curtains enhance decorative molding instead of detracting from it. The result feels intentional, balanced, and professionally designed—without sacrificing architectural charm.
For additional architectural guidance on historic trim and molding preservation, visit the National Park Service’s official guide on historic interiors: https://www.nps.gov

I’m the creator behind EasyDecora, a home–decor lover who enjoys discovering simple, beautiful ways to make every room feel cozy and intentional. I share practical tips, creative ideas, and inspiration for anyone who wants to build a home they truly love.