

Learning how to install a decorative door knob gives homeowners control over both style and function. Decorative knobs do more than open and close doors; they influence first impressions, elevate interior design, and add character to otherwise plain spaces. Whether refreshing a bedroom door or upgrading an entryway, proper installation ensures the knob looks refined and performs smoothly for years.
Decorative door knobs differ from standard hardware in design complexity and finish quality. Many include ornate backplates, premium metals, or vintage-inspired detailing that requires careful handling during installation. Following the correct process prevents alignment issues, protects finishes, and preserves door integrity.
This guide focuses entirely on how to install a decorative door knob correctly, using clear steps, accurate measurements, and best practices trusted by professionals.
In This Article
Decorative Door Knob Types and Compatibility Essentials
Before installing decorative hardware, understanding knob types and door compatibility avoids costly mistakes. Decorative door knobs fall into specific categories based on function and location.
Common Types of Decorative Door Knobs
| Knob Type | Best Use Case | Locking Feature |
| Passage Knob | Hallways, closets | No |
| Privacy Knob | Bedrooms, bathrooms | Yes (push or twist) |
| Dummy Knob | Closets, pantry doors | No latch |
| Keyed Entry Knob | Exterior doors | Key lock |
Each type installs slightly differently, especially dummy knobs that mount to only one side of the door.
Door Compatibility Factors to Check
Proper installation depends on accurate door specifications. Decorative knobs often require tighter tolerances than standard sets.
Confirm these details before starting:
- Door thickness: Most decorative knobs fit doors between 1⅜″ and 1¾″
- Backset measurement: Common sizes include 2⅜″ and 2¾″
- Bore hole diameter: Standard is 2⅛″
- Latch faceplate shape: Square or rounded, depending on door edge
Ignoring compatibility frequently leads to misaligned knobs or exposed hardware edges.
“Decorative hardware must match the door’s structure just as much as its style,” notes a senior installer from This Old House.
Tools and Materials Needed to Install a Decorative Door Knob
Successful decorative door knob installation relies on preparation. Using the correct tools reduces installation time and protects delicate finishes.
Essential Tools Checklist
- Phillips-head screwdriver
- Flathead screwdriver
- Measuring tape
- Small level
- Soft cloth or towel (to protect finishes)
Power drills remain optional but should be set to low torque if used.
Materials Included in Decorative Door Knob Sets
Most quality decorative knobs include:
- Interior and exterior knobs
- Latch mechanism
- Strike plate
- Mounting screws
- Decorative rosettes or backplates
Premium brands often package screws to match the finish, preventing visual inconsistency.
Optional Tools for Older or Custom Doors
Older homes may require additional equipment:
- Wood filler for worn holes
- Chisel for latch plate adjustments
- Drill with hole saw for resizing bores
Using a towel beneath work areas prevents accidental scratches, especially on polished brass or oil-rubbed bronze finishes.
Fact: Professional installers recommend hand-tightening final screws to avoid cracking decorative backplates.
Preparing the Door Before Installing a Decorative Door Knob
Proper preparation determines how smoothly the installation goes and how refined the final result looks. Decorative hardware highlights imperfections more than standard knobs, making this step especially important when learning how to install a decorative door knob correctly.
Inspecting Existing Door Holes and Alignment
Careful inspection prevents misalignment later in the process. Decorative knobs rely on precise spacing to sit flush against the door surface.
Check the following elements closely:
- Bore hole diameter: Standard size measures 2⅛ inches
- Latch hole depth: Must match latch length fully
- Door edge condition: Cracks, splintering, or paint buildup can interfere
- Strike plate alignment: Latch should meet the plate without friction
Irregular holes should be repaired before installation begins.
Measuring Backset and Door Thickness Accurately
Backset refers to the distance from the door edge to the center of the bore hole. Decorative door knobs typically support adjustable backsets, yet confirmation remains essential.
| Measurement Type | Standard Range |
| Backset | 2⅜″ or 2¾″ |
| Door Thickness | 1⅜″–1¾″ |
| Latch Plate Height | 1″–1¼″ |
Measuring tape accuracy prevents loose knobs and uneven rosettes.
Making Necessary Adjustments Before Installation
Older doors often need minor corrections. Wood filler strengthens worn holes, while light chiseling creates a clean recess for square latch plates. Paint buildup along door edges should be sanded lightly to allow the latch to sit flush.
Preparation creates the foundation for a flawless decorative finish.
Removing an Old Knob Prior to Decorative Door Knob Installation
Replacing existing hardware requires patience, especially when removing painted-over or vintage knobs. Careful removal protects the door and simplifies installing the new decorative set.
Safely Removing the Existing Door Knob
Start by locating visible screws on the interior side of the knob. Some decorative or older knobs hide screws beneath a removable cover plate.
Removal steps include:
- Loosening mounting screws evenly
- Pulling knobs straight out from both sides
- Sliding the latch out from the door edge
Gentle pressure prevents splitting wood or damaging door faces.
Handling Stubborn or Painted Hardware
Paint frequently seals knobs to doors over time. Scoring around backplates with a utility knife breaks paint adhesion. Flathead screwdrivers wrapped in cloth help pry hardware loose without marring surfaces.
“Never force a painted knob—controlled pressure avoids costly door repairs.”
Inspecting the Door After Removal
Once hardware comes off, inspect the door thoroughly:
- Confirm holes remain round and centered
- Remove debris, old screws, or wood fragments
- Check latch cavity depth and cleanliness
Doors showing excessive wear may benefit from reinforcement before proceeding.
Installing the Latch for a Decorative Door Knob
Latch installation forms the mechanical heart of decorative door knob functionality. Precision at this stage ensures smooth turning and secure closure.
Identifying Proper Latch Orientation
Latch bevels must face the door jamb to allow easy closing. Incorrect orientation causes sticking or failure to latch.
Decorative latches typically feature:
- Adjustable backsets
- Square or rounded faceplates
- Spring-loaded tongues
Confirm adjustment matches measured backset before inserting the latch.
Securing the Latch into the Door Edge
Slide the latch into the edge bore carefully. Faceplate edges should sit flush against the door surface without gaps.
Installation tips:
- Hand-tighten screws first
- Use a level to confirm vertical alignment
- Avoid over-tightening to prevent wood compression
Flush installation supports smooth knob operation and clean aesthetics.
Testing Latch Movement Before Knob Installation
Press the latch tongue several times to confirm smooth retraction. Resistance often signals misalignment or debris inside the cavity. Fixing latch issues now avoids disassembly later.
Professional installers agree: a properly seated latch eliminates 80% of door hardware problems.
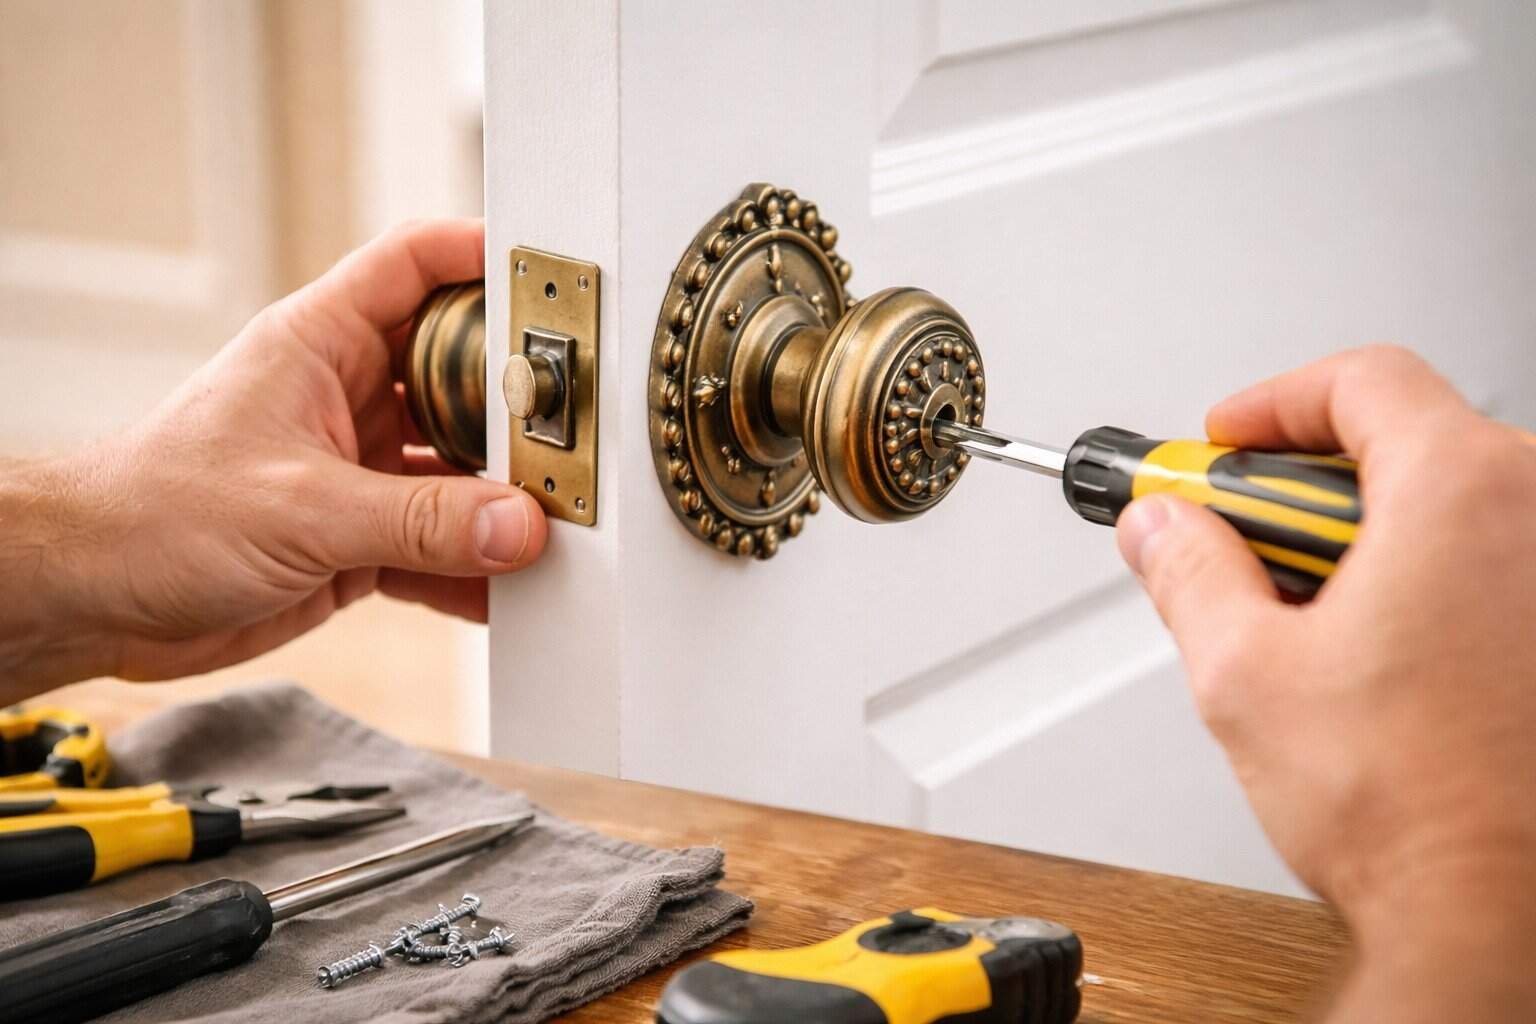
How to Install a Decorative Door Knob: Step-by-Step Instructions
This stage brings everything together. Following precise steps ensures the decorative knob sits evenly, turns smoothly, and highlights the door’s design rather than distracting from it. Understanding how to install a decorative door knob correctly at this point prevents wobbling, scraping, and long-term wear.
Aligning the Exterior and Interior Knobs
Begin by inserting the exterior knob spindle through the latch mechanism. Decorative knobs often feature thicker spindles or ornamental shafts, so alignment must be exact.
Key alignment checks include:
- Spindle passing cleanly through the latch hub
- Exterior knob sitting flush against the door face
- No visible gaps between knob and door surface
Interior knobs should slide into place without force. Resistance usually signals a misaligned latch.
Installing and Tightening Mounting Screws
Mounting screws secure both sides of the knob together. Decorative hardware typically includes concealed screws to preserve aesthetics.
Best practices for tightening:
- Start screws by hand to avoid cross-threading
- Tighten each screw gradually and evenly
- Alternate sides to maintain balance
Uneven tightening causes tilted knobs and off-center rosettes.
Keeping Decorative Plates Level and Centered
Before final tightening, use a small level or visual reference to ensure plates remain straight. Decorative backplates exaggerate even slight misalignment.
Perfect symmetry enhances the visual impact of decorative hardware.
How to Install a Decorative Door Knob on Pre-Drilled vs. Solid Doors
Installation varies depending on whether the door is factory-prepped or completely solid. Decorative hardware demands extra attention on non-standard doors.
Installing Decorative Door Knobs on Pre-Drilled Doors
Most modern interior doors come pre-drilled to standard dimensions, making installation straightforward.
Advantages include:
- Consistent bore sizes
- Correct latch depth
- Minimal tool requirements
Decorative knobs designed for modern doors typically slide into place with little adjustment.
Installing Decorative Door Knobs on Solid or Antique Doors
Solid wood or antique doors require more preparation. Decorative knobs often suit historic homes, but measurements must be exact.
Additional considerations:
- Drilling precise bore holes using a hole saw
- Chiseling latch recesses for square faceplates
- Reinforcing soft or aged wood
Incorrect drilling risks permanent damage to valuable doors.
Case Study: Installing Decorative Knobs on a 1920s Wood Door
A homeowner upgrading a 1920s craftsman home replaced plain knobs with oil-rubbed bronze decorative hardware. Careful drilling and wood reinforcement allowed modern knobs to install cleanly without compromising the original door. The result preserved historical character while improving usability.
Aligning and Securing Decorative Backplates and Rosettes
Decorative backplates and rosettes define the visual appeal of the knob. Proper alignment elevates the entire door’s appearance.
Centering Decorative Elements Precisely
Position backplates so they cover bore holes completely while remaining symmetrical on both sides. Misaligned plates draw attention immediately.
Alignment tips include:
- Rotate plates gently before tightening
- Confirm equal spacing around the spindle
- Match orientation on both door faces
Preventing Scratches and Finish Damage
Decorative finishes scratch easily. Soft cloths beneath tools and slow adjustments preserve the surface.
Protective measures:
- Avoid metal-on-metal contact
- Never use power drivers for final tightening
- Clean fingerprints immediately after installation
Final Tightening Techniques for a Polished Look
Once aligned, tighten screws until snug—not forced. Over-tightening can crack decorative plates or compress wood fibers.
Experienced installers stop tightening the moment resistance increases.
Testing the Decorative Door Knob After Installation
Testing confirms whether the installation was successful and ensures the decorative door knob functions as smoothly as it looks. Skipping this step often leads to minor issues that worsen over time.
Checking Latch Engagement and Door Closure
Slowly close the door and observe how the latch meets the strike plate. Proper engagement should feel effortless and quiet.
Signs of correct installation include:
- Latch retracts fully when knob turns
- Door closes without pushing or slamming
- No scraping or resistance at the jamb
Misalignment usually indicates the latch or strike plate needs a slight adjustment.
Ensuring Smooth Turning and Locking Function
Rotate the knob several times in both directions. Privacy and keyed knobs should lock and unlock cleanly without stiffness.
Test checklist:
- Knob returns to neutral position
- Lock engages instantly
- No internal rattling sounds
Smooth operation reflects correct spindle alignment and even screw tension.
Making Final Micro-Adjustments
Minor tweaks often improve performance dramatically. Loosening screws by a quarter turn or nudging the strike plate can resolve most issues quickly.
Professional installers test knobs at least ten times before calling the job finished.
Common Mistakes When Installing a Decorative Door Knob
Decorative hardware requires more care than basic knobs. Understanding frequent mistakes helps avoid frustration and costly replacements.
Over-Tightening Mounting Screws
Excessive force compresses wood fibers and cracks decorative backplates. Hand-tightening remains the safest method.
Misaligned Latch or Strike Plate
Even a few millimeters off can cause sticking. Alignment should prioritize smooth function before aesthetics.
Skipping Measurements and Compatibility Checks
Installing decorative knobs without verifying backset or door thickness leads to loose or uneven hardware.
Quick reminder list:
- Measure twice, install once
- Align before tightening
- Test before finishing
Avoiding these errors saves time and preserves door integrity.
Maintenance Tips to Keep a Decorative Door Knob Looking New
Decorative door knobs deserve ongoing care to maintain both appearance and performance.
Cleaning Decorative Finishes Safely
Different finishes require specific cleaning methods.
| Finish Type | Recommended Cleaning |
| Polished Brass | Soft cloth, mild soap |
| Matte Black | Damp microfiber cloth |
| Oil-Rubbed Bronze | Dry cloth only |
| Satin Nickel | Non-abrasive cleaner |
Harsh chemicals damage protective coatings and dull finishes.
Preventing Loosening Over Time
Seasonal humidity changes can loosen screws. Checking tightness twice a year keeps knobs secure.
Protecting Ornamental Details from Wear
Avoid hanging heavy objects on knobs. Decorative elements bend or crack under excess weight.
Consistent maintenance extends hardware lifespan by years.
When to Replace or Upgrade Your Decorative Door Knob
Decorative door knobs eventually reach a point where replacement improves both function and design.
Signs Replacement Is Necessary
- Knob wobbles despite tightening
- Finish shows deep corrosion
- Locking mechanism fails repeatedly
Replacing worn hardware improves security and aesthetics instantly.
Style Updates vs. Functional Improvements
Upgrading decorative knobs often aligns with home renovations. Coordinating finishes across rooms creates visual harmony.
Coordinating with Other Decorative Hardware
Matching hinges, strike plates, and cabinet pulls reinforces a cohesive interior design theme.
Final Thoughts on How to Install a Decorative Door Knob Correctly
Mastering how to install a decorative door knob empowers homeowners to enhance their spaces without professional help. From careful preparation to precise alignment and testing, each step contributes to a refined final result. Decorative hardware rewards patience, accuracy, and attention to detail.
Those seeking additional guidance on door hardware standards can explore trusted resources from the Family Handyman, which offers practical insights for homeowners:
https://www.familyhandyman.com/project/how-to-install-a-door-knob/
With proper installation and routine care, a decorative door knob becomes more than hardware—it becomes a lasting design statement that elevates every door it touches.

I’m the creator behind EasyDecora, a home–decor lover who enjoys discovering simple, beautiful ways to make every room feel cozy and intentional. I share practical tips, creative ideas, and inspiration for anyone who wants to build a home they truly love.